![]()
User
Manual
mg/dL
version
mmol/L
version
Contact
Juggluco (juggle glucose) is an alternative Android app for Abbott's FreeStyle Libre 1, 2, 2+, 3, 3+, Dexcom G7/ONE+, AccuChek SmartGuide, Sibionics GS1 (Chinese, EU and Hematonix) and GS3, CareSens Air, and Linx/Aidex-X sensors, meant for glucose control by people with diabetes. Libre 1 and Libre 2 sensors can be scanned via NFC to display the current value and the 15-minute values stored in the sensor memory. For Libre 2 and 3 sensors it displays the glucose values received every minute via Bluetooth.
The value received via Bluetooth from Libre 2 sensors, is exactly the same as the one received by scanning. And these same values will also be used in the sensor to generate the history values of the past 8 hours you also receive by scanning. From its introduction in 2018 until 2023, Abbott's Libre app used Bluetooth glucose values only for glucose alarms. Only in 2023, in Librelink 2.10.0, does Abbott's Libre app also display the glucose values received via Bluetooth. Until then, they stuck with the idea that NFC scanning was a good idea. And indeed they were remarkably successful in terms of sales.
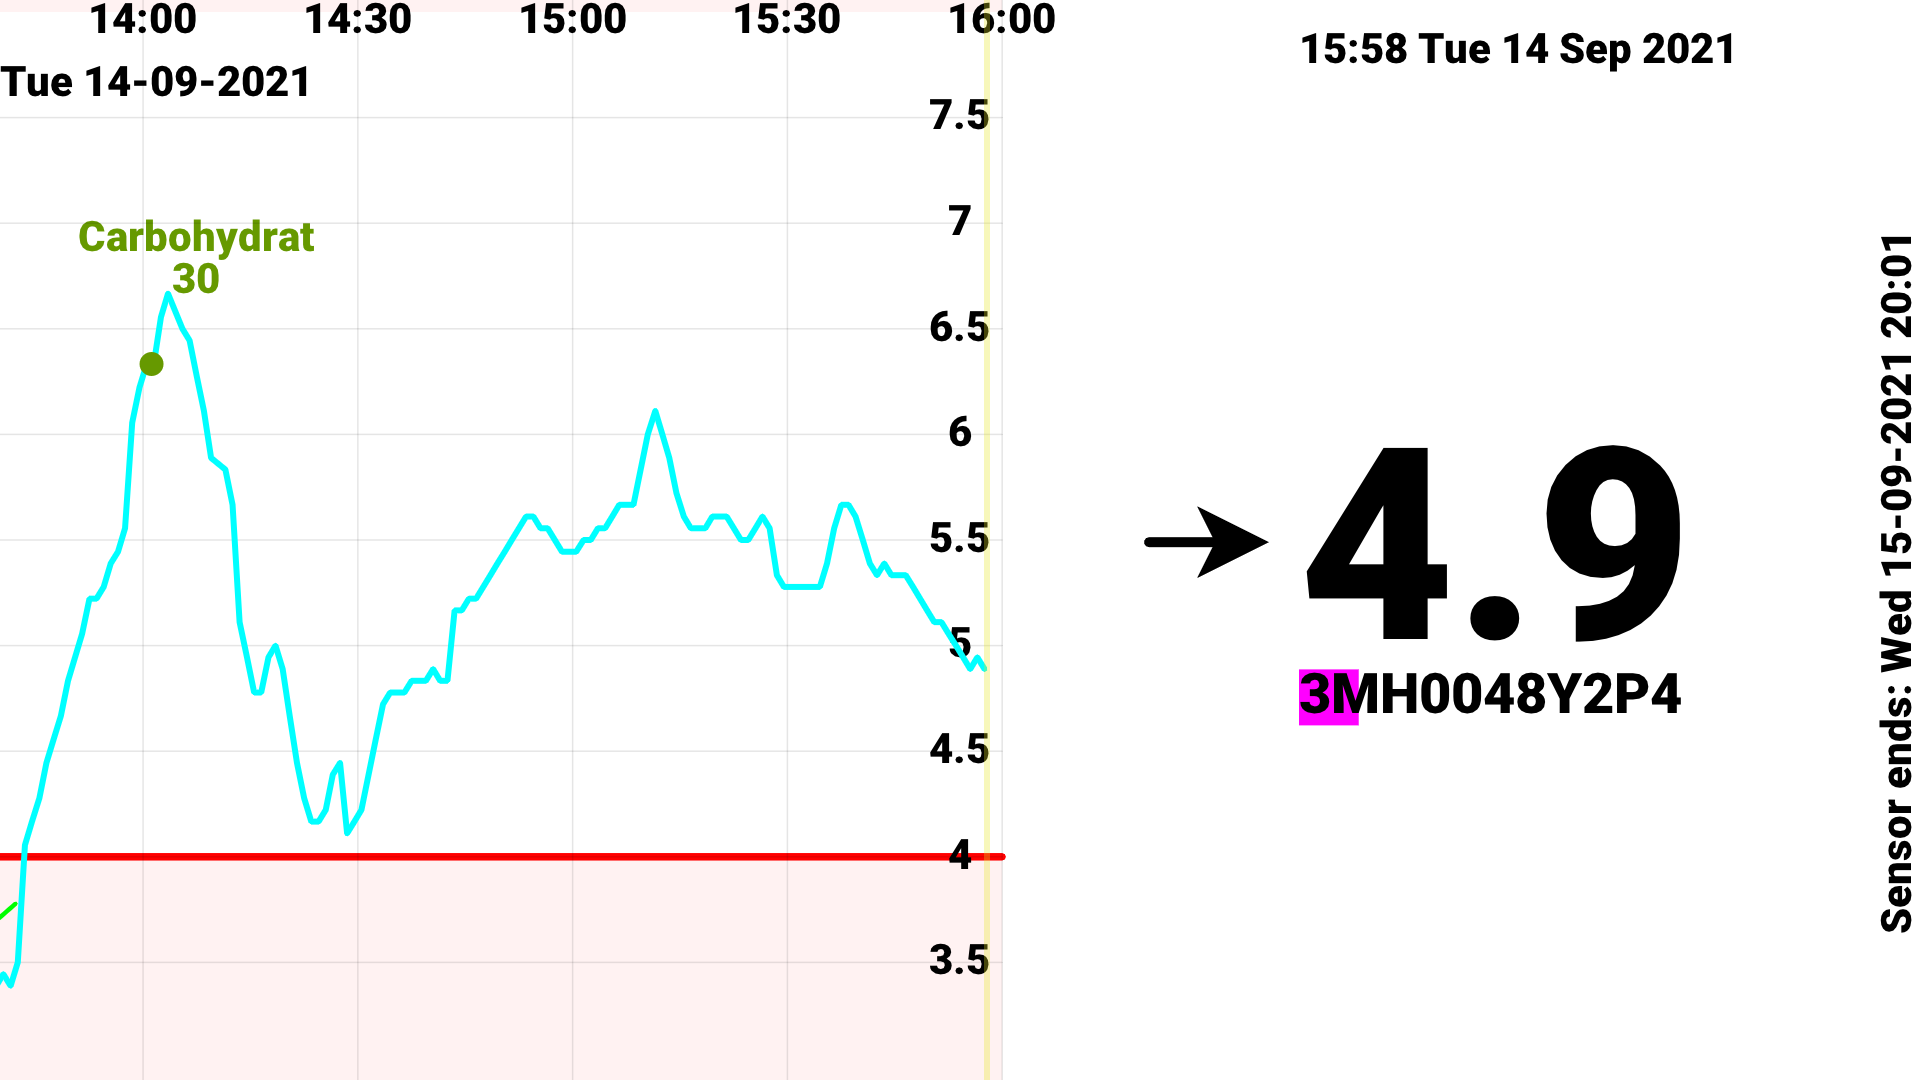
Apps like the official Librelink app from Abbott display the glucose graph in a very reduced form in portrait mode, which maybe allows a doctor to see at a glance how well someone is doing, but is insufficient for a diabetes patient to see exactly how the glucose curve (its peaks and troughs) relates to other events like carbohydrate intake, insulin doses, and physical activity.
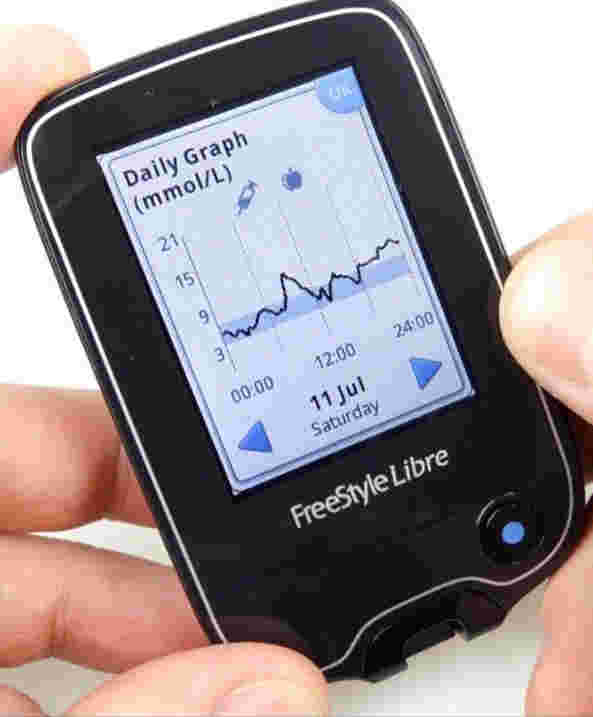
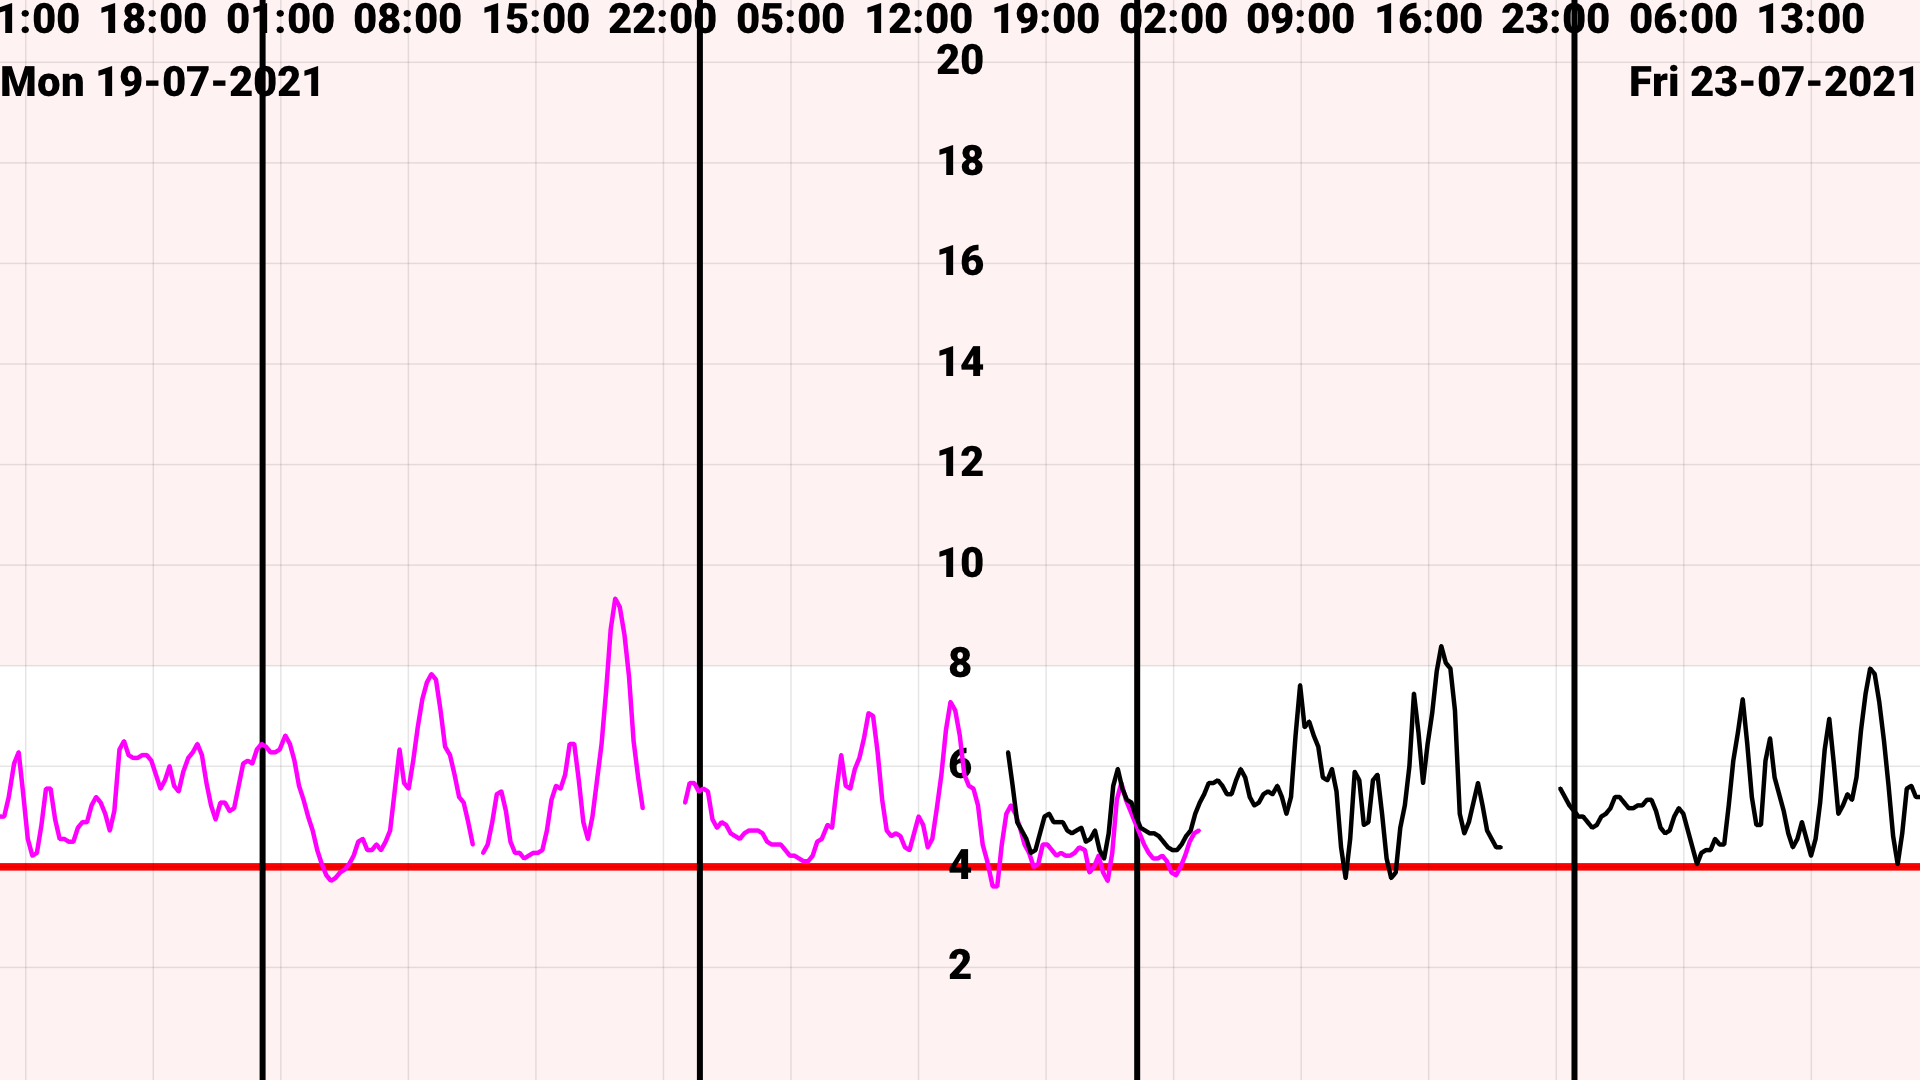
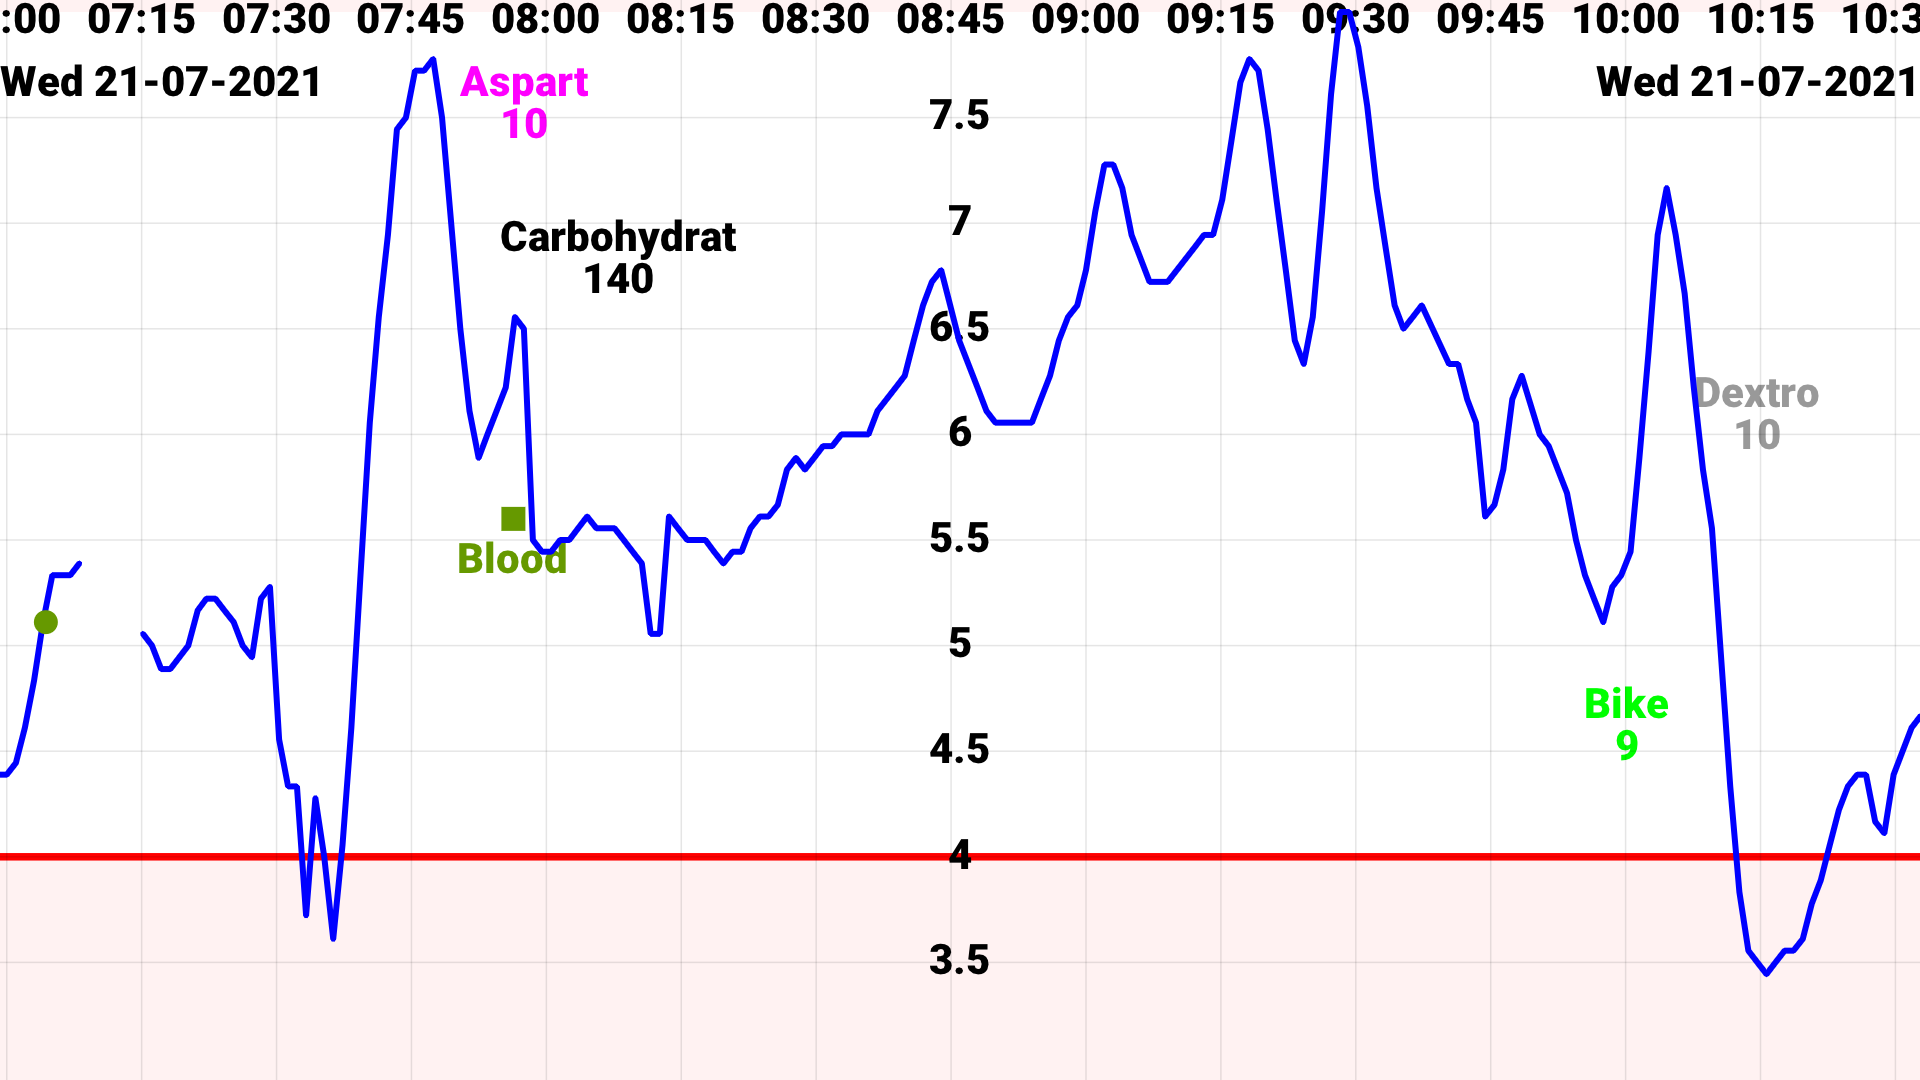
Juggluco uses the whole screen in landscape mode for the glucose curve. With two fingers you can zoom the time axis in or out without any restriction (you can disable this in settings). Abbott's app uses a fixed vertical range of 0–21 mmol/L (0–378 mg/dL). In Juggluco, you can configure the vertical range in settings (or change it manually by moving up and down if allowed in settings). You can add insulin doses, carbohydrate intake, and activity amounts to the graph, so you can see their relationship to glucose values.
By simply moving over the screen left or right you can move the curve backwards and forwards in time.
The app has four menus, opened by touching different quarters of the screen. The rightmost menu is the movement menu, by which you can move one day or one week back in time with one extra touch after opening the menu with a first touch. In addition, you can jump to a specific date or search for a glucose value, food amount, insulin dose, or any other entered number.


You can set low and high glucose alarms and choose separate ringtones for each. You can also add medication reminders, for example an alarm if no long-acting insulin amount was entered between 21:00 and 22:00.


With the mirror function, one Juggluco instance can send data over TCP/IP to another Juggluco instance running on another Android device. This has all kinds of uses: transferring data to a new phone, displaying it on a tablet or emulator. Setting alarms on a mirror device is also possible. With the scan data the mirror app also receives the Bluetooth connection data, making it possible for devices without NFC to connect via Bluetooth with the sensor. You can also display exactly the same data on a second phone that is connected over the internet to a phone running Juggluco connected to the sensor (see details). There is also a desktop command line program that can receive data from and resend data to Juggluco (with the program found here).
The glucose values received by Bluetooth differ little from the scanned values of Abbott's Libre/Librelink app. The values displayed in Juggluco and Abbott's Libre app are determined the same way, but previous readings influence displayed values. Consequently if you use one of them longer, they will give somewhat different values. When used beside each other, differences will diminish with time.
European Libre 2 sensors can handle multiple apps on the same phone connected to the same sensor quite well. The alarms will become less reliable, but you can view two apps at the same time. Sometimes somehow Bluetooth streaming stops totally after the sensor was out of reach for some time, something that never happens otherwise. You have to turn Bluetooth off and on to get it running again.
Only one app will be able to establish a connection with the sensor on its own (except when you run a mirror Juggluco on the same phone). When there are connection issues while running two apps in parallel, you should kill the app which can't establish a connection. Mostly it is the app that last came to know the sensor that can make the connection. Librelink will not use Bluetooth when it didn't start the sensor. Juggluco will always try to establish a Bluetooth connection (when "Sensor via Bluetooth" is turned on). When the sensor was scanned with another exemplar of Juggluco or the patched Librelink app, you need to scan the sensor again with Juggluco after it failed to connect to the sensor.Apps running on different devices can't connect in parallel with the same sensor. Freestyle Reader will interfere more with Juggluco than the Librelink app. When the sensor is connected to Juggluco running on a WearOS watch, Abbott's Libre app will disrupt the connection (if it was used to start the sensor). Juggluco will normally not try to connect with the sensor anymore when it transfers the sensor to the watch. To be certain that nothing is still running somehow, you can kill Juggluco and let it restart itself. US/CA/AU Libre 2 sensors can't connect to multiple apps on the same phone in parallel. The same is true for all Libre 3 sensors.


After scanning something like the right picture above is shown. The number is the 'current' glucose value, the curve displays the glucose pattern of the past 16 minutes and is taken out of the sensor by NFC scanning. Abbott's Librelink app uses these values only to determine the angle of the arrow that displays the direction of change. The curve, Juggluco displayed after scanning, is drawn directly from the raw values and differs a bit from the values received via Bluetooth for which Abbott's calibration algorithm is used. With Freestyle libre 2, NFC scanning has become of minor interest. You only need it to startup the sensor, enable Bluetooth streaming and now and then to find out what is wrong and to get the sensor working again.

To display the age of the displayed glucose value, the Sensor Identifier under the glucose value, is colored in proportion to how long ago the glucose value was received from the sensor. The total length of the Sensor identifier is 5.5 minutes, thus if the Sensor Identifier is totally colored it was 5.5 minutes ago the glucose value was received from the sensor. If more than 5.5 minutes have passed since the last glucose value was received, the value is no longer displayed. Immediately after a new glucose value has arrived the sensor id isn't colored at all, after one minute it is colored for a nearly a fifth. The screen is only refreshed on every minute tick or when the user touches the screen, thus not all degrees of age are immediately shown on the screen. If you want a number of the time of the measurement, you can save the glucose values with Left middle screen->Export->Stream. Touching the last point of the glucose curve will also display the measurement time of that value.
Values below 2.2 mmol/L (40 mg/dL) are displayed as 2.2> (40>), meaning that 2.2 mmol/L (40 mg/dL) is larger than the real value. In Librelink this is show as LO. I myself didn't consider that very handy, especially in the beginning: at the moment you have to eat glucose as quickly as possible you first have to find out what that LO means.
Values above 27.8 mmol/L (500 mg/dL) are display 27.8< (500<), meaning that 27.8 mmol/L (500 mg/dL) is smaller than the real value. In Librelink this is displayed as HI.
The Libre 2 sensors in the USA are different from those in Germany or the Netherlands. Libre 2 sensors in Australia and Canada are also reported to be different from European sensors. Some apps that work with European Libre 2 sensors don't work with sensors in the USA or Canada. Juggluco works with all these sensors, but US like sensors require a higher Android version and data processing requires more resources.
Sensor errors (373, wait 10 minutes) are usually generated in Juggluco at exactly the same moment they are generated in the Libre app. An exception is that older version of the librelink app sometimes don't generate sensor errors when newer versions do. So if someone compares the patched Librelink 2.3.0 app with Juggluco, he will sometimes see that Juggluco generates a sensor error, but the patched Librelink 2.3.0 will not.
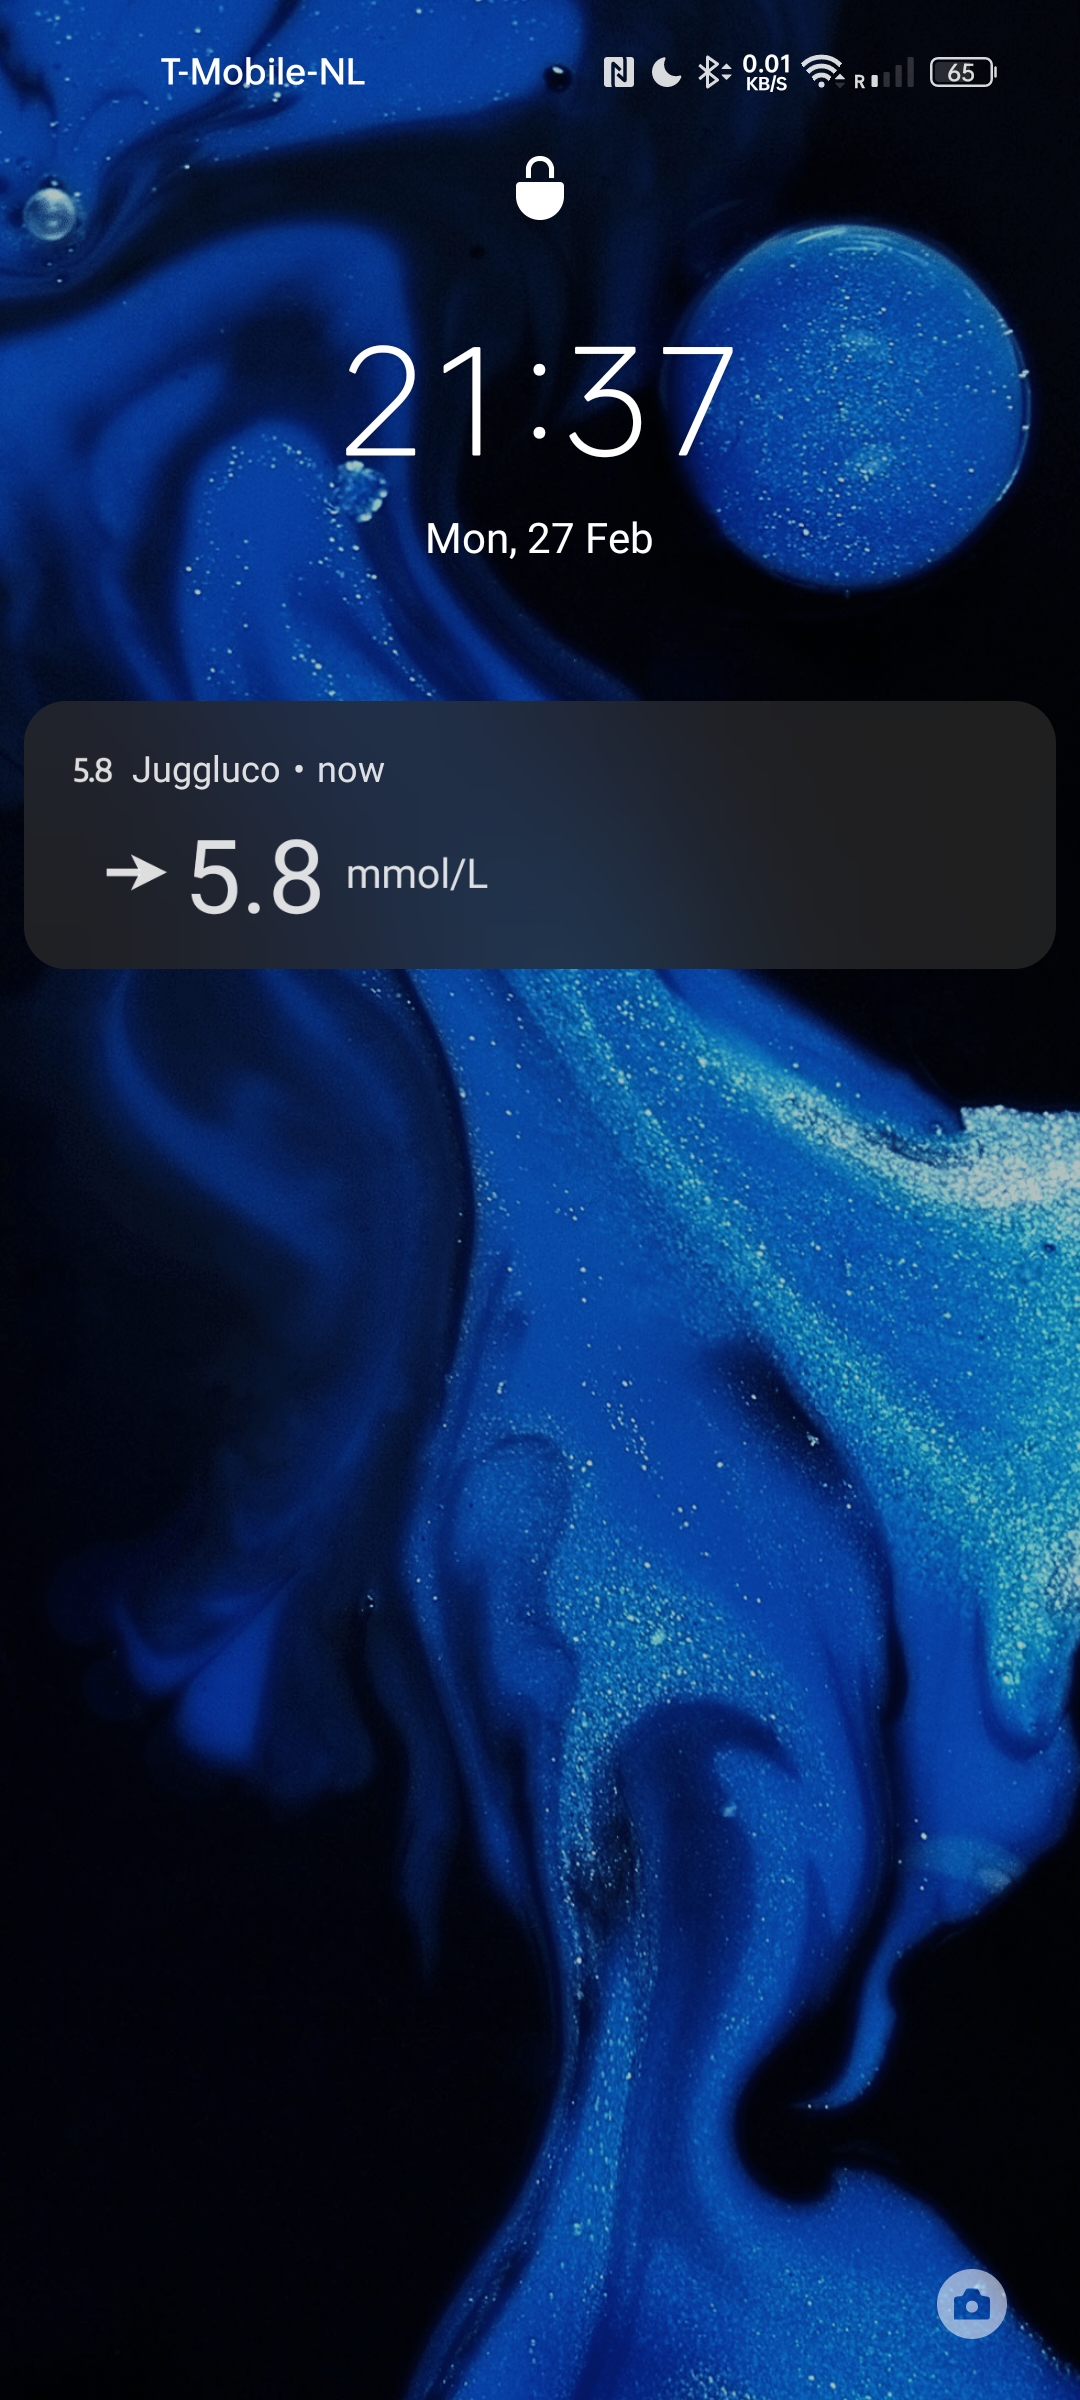
The stream of glucose values received via Bluetooth is also displayed in the Android status bar and a notification.
On some smartphones you have to change the notifications settings to see the current glucose value in the Android status bar and/or on the lock screen. How you can do this is device dependent. In Android settings you can find somewhere notifications. From a list of apps you can select Juggluco and under Juggluco glucoseNotification and then you have all kind of options, like "Set as silent" (unset), "display on status bar" (set) and "hide details on lock screen" (unset).
On Android 13 and later, grant Juggluco notification permission.
It is possible that with a certain combination of lock screen color settings, only the icon is visible. Switching to dark mode helps.
Don't set "Icon only" in your lock screen settings.
On some smartphones, only notifications generated after the screen was locked are displayed, so you will not immediately see whether the settings change was effective.
Juggluco has the possibility to show the current glucose value received via Bluetooth above other apps. In Left menu->Settings->Floating Glucose, you can change colors, transparency, and whether touches pass through to the app underneath or move the floating glucose display. You can turn it on and off in Left middle menu->Float.
To use Floating Glucose under Android Automotive and WearOS you need to give Juggluco permission to display over other apps with the following command:
adb shell pm grant tk.glucodata android.permission.SYSTEM_ALERT_WINDOW
It is also possible to give Juggluco all permissions it uses during install with:
adb install -g -r JugglucoVERSION-wear-arm32.apk
Where JugglucoVERSION-wear-arm32.apk is the WearOS APK downloaded from:
https://www.juggluco.nl/Juggluco/download.html
-g means that you grant all permissions.
If your smartwatch can receive Android notifications, select Notify in Juggluco's under left menu->Watch. After configuring your smartwatch app to forward Juggluco notifications, you can see your current glucose level on your watch every minute. This can be useful during physical activity. On most watches you need to specify "Separate" to generate every time a new notification, because their companion app only forwards new notifications.
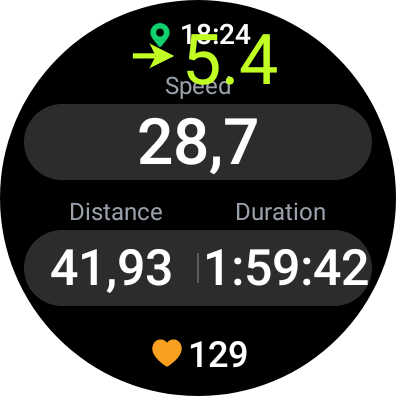
There is also a Garmin watch app, Kerfstok, that can show your current glucose value, enter numbers, display speed and distance during activity, and record activity.
The web server in Juggluco recognises commands of the xDrip webservice. This means that xDrip watch apps can receive glucose values directly from Juggluco. You can turn this on in the left menu->watch of Juggluco. Use the Help button there for more information.
Juggluco also runs on Wear OS. See https://www.juggluco.nl/JugglucoWearOS for more information
For all watches, see the help under left menu -> Watch.
Juggluco shows the percentage of measurements in standard glucose ranges and in the target range configured in settings. For each minute of the day, it calculates the distribution of values over the selected period and derives median and percentile bands. See: Statistics help


Using Export in the left middle menu, you can save data in tab-separated format (.tsv). You can then analyze the file with statistical software such as the R package iglu. https://www.juggluco.nl/Juggluco/iglu.html
Other apps can receive glucose values from Juggluco through glucose broadcasts.
In Juggluco's settings you can configure Juggluco to send its glucose values to other apps. Juggluco can send three types of such broadcasts.
The Patched Libre broadcast was originally used by the patched Librelink app and can be used to send glucose values to xDrip.
EverSense Broadcast: a better alternative for the Patched Libre broadcast.
The xDrip broadcast was originally used by xDrip and can be used to send glucose values to AAPS.
The Glucodata broadcast came with Juggluco and can be sent to G-Watch and GlucoDataHandler
In settings, you can ask Juggluco to send glucose values to LibreView. These are the 5-minute (Libre 3) or 15-minute (Libre 2) history values. In LibreView, you can select Download Glucose Data to export these data to a .csv file. This data can be imported in apps like Diabetes:M or Glooko. Juggluco you can also save data directly in Libreview format in left middle menu→Export.
In Libreview under Account Settings->My Devices you can delete all data send to Libreview from a particular device. So if you don't like the data or want to send everything anew with a new version of Juggluco, you can do that. Maybe it is a good idea to decline to share your glucose and product-related data for the purposes of research under Account Settings->Profile
To send amounts of insulin, carbohydrate, etc. to Libreview you have to specify for each label what should be done with it (Settings->Exchange data->Libreview->Send amounts).
I have to mention that you can also save glucose values in Juggluco itself, by going to Left middle menu-> Export and select Stream, in this case you get a value for every minute. To view some statistics of these data you can go to Left middle menu-> Statistics (see Aggregate data).
Before version 10.0.0 Juggluco didn’t allow manual calibration of glucose values with the following justification: nocalibration.html
Juggluco 10.0.0 added calibration possibilities. It tried to do this in a way that makes it possible to keep on eye on the original values and see what calibration does. You can use all appropriate blood glucose measurements for calibration, but still keep using only the uncalibrated values to see what the effect of calibration will be before using it.
In the right middle menu, ✓ before Stream, Scan or History means that the calibrated values are shown. (The [x] after Stream, Scan and History still means the display of the uncalibrated value.)


To calibrate, you specify in left menu→Settings→Calibration, the label under which blood glucose values are entered. Thereafter, every value entered under that label in left middle menu→New Amount, is used for calibration, except when “Exclude” is checked. You need to check “Exclude” for all values that are inappropriate for calibration, because the glucose is not steady, or it is during the warm-up period. (A blood glucose measurement less than 30 minutes before a second blood glucose measurement is automatically excluded.)

This does not cause calibrated values to be used for alarms, notifications, watches, or other outputs. To use calibrated values for those purposes, enable Active in Left menu → Settings → Calibration. Adding recent calibrations means the calibration gains weight.
Juggluco uses all blood glucose measurements that are not excluded during the lifetime of the sensor, but gives older values less weight. Adding recent calibrations mean that the calibration gains wait. With less weight the calibrated value diverges less from the uncalibrated value. Also, a calibration that is older will be given less weight, which means that the calibrated glucose values moves in the direction of uncalibrated values with time when there are no new blood glucose measurements.

By long-pressing the glucose curve for a sensor, a view will be shown with the button “Calibrations”. Pressing it will show all calibrations for this sensor.

A calibration is recalculated after pressing “Save” in “New amount”. This can give a different value because of the following reasons:
The “Exclude” setting changed;
The setting of left menu→Settings→”Change slope” changed;
With time CGM glucose values are available that were not present when the blood glucose value was first entered; Later a better matching glucose value can arrive that will be taken instead of an earlier one to compare with the blood glucose value.
With the entered numbers (amounts), calibrations are also sent to mirror devices, for example from the phone to the watch when “Enter numbers (amounts) on watch” is not checked. (If it is checked it is sent in the opposite direction.)
Previously there were reports of Bluetooth connection problems with devices running Android 13 with Libre 2 and 3 sensors. It seems that after a system update they don’t exist anymore. I myself updated recently to Android 13. Bluetooth functioned perfectly. There is only one difference of significance: apps I killed with “Force stop” restart more often than under Android 12. When a US Libre 2 sensor or Libre 3 sensor was started with Abbott’s Libre app, that app will restart more easily and disrupt the connection of Juggluco with the sensor.
Juggluco's source code can be found at: https://github.com/j-kaltes/Juggluco
Juggluco supports NFC NovoPen® 6 and NovoPen Echo® Plus insulin pens. Hold the back of the pen to the phone's NFC sensor while Juggluco is in the foreground. Then choose which label should store the new values. For the case you have previously entered the insulin dose data by hand, you can specify that only doses after a certain date and time should be added.

Juggluco has multiple possibilities to send glucose values to other devices in real-time so that someone else can follow the glucose readings from Freestyle Libre 2 or 3 sensors with little delay.
With mirror you can display all data of Juggluco to another instance of Juggluco running on an Android device or Android emulator running under Windows, Macintosh or Linux.
To connect two phones it is mostly necessary to connect both to Juggluco server running on a computer or to the Android Juggluco app running on a phone or tablet left at home connected to the internet via a modem.
The web server in Juggluco and Juggluco server know some Nightscout server commands, so that Nightscout followers can connect to it. It cannot be used with all Nightscout apps: the Android app NSClient and the iOS apps Nightscout and Nightscout X only work with a particular Nightscout implementation. The last two do nothing more than displaying the Nightscout web page.
For more information, see the help in Juggluco under Left menu->Settings->Exchange data->Webserver.
If you want to make a program making use of it, see https://www.juggluco.nl/Juggluco/webserver.htmlYou can also upload glucose values from Juggluco to https://github.com/nightscout/cgm-remote-monitor. See Left menu->Settings->Exchange data->Uploader->Help.
Glucose values sent to Libreview can also be sent to Abbott's LibrelinkUp app. When Immediate is enabled in Left menu->Settings->Exchange data->Libreview, Juggluco sends every glucose value received from Libre 2 or 3 sensors to LibreView, where it can be shared with LibreLinkUp. In Abbott's Libre app under Connected apps->Librelinkup you can invite an email address to receive these data.
Juggluco's data can be exported to a file or sent to other apps via broadcasts or a web interface. There is demand for the analysis and display of these data, for example to send a quick overview to a medical practitioner.
Make a watch app to display glucose values received from Juggluco. Add Watch


The simplest way to transfer to a new phone is to use mirror/clone. On the old phone you press left middle menu→Mirror→Auto QR. On the new phone you install Juggluco and go to left menu→Photo and scan the QR code. After some time you will see that all data has arrived. Then you can switch off left menu→Sensor→Use Bluetooth on the old phone and switch it on on the new phone. Hereafter you can remove the mirror connection from both phones in left middle menu→ Mirror by touching the connection, pressing Modify followed by Delete.
Another possibility is to use tar via adb:
On both phones you need to install/update to Juggluco from the https://www.juggluco.nl/Juggluco/download.html; run-as doesn't work with the Google Play version.
Run Juggluco on the new phone, then force stop Juggluco on the new phone.
On the computer while connected to the old phone:
adb exec-out run-as tk.glucodata tar -cf - ./files > all.tar
On the computer while connected to the new phone:
Under sh (Linux) and Command Prompt (Windows):
adb exec-in run-as tk.glucodata tar -xf - < all.tar
Or under Powershell or sh:
cat all.tar|adb exec-in run-as tk.glucodata tar -xf -